In this post I aim to go over the basics of Master Materials in UE in as simple terms as possible. What they are, why we use them and how to make a very basic one. This is aimed at beginners.
1. What's a Master Material?
Master Materials are very similar to any other materials you create inside Unreal. They can range from being simple graphs with a couple of shader instructions and texture samples to gigantic, complex ones with multiple nested functions, parameters and parameter collections.
The main difference is in how Master Material inputs are parameterised. While regular materials use Static Values (textures, numbers [integers, floats, etc.] and so on) most if not all nodes in a Master Mat will be turned into Parameters (same but can be edited in a Material Instance).
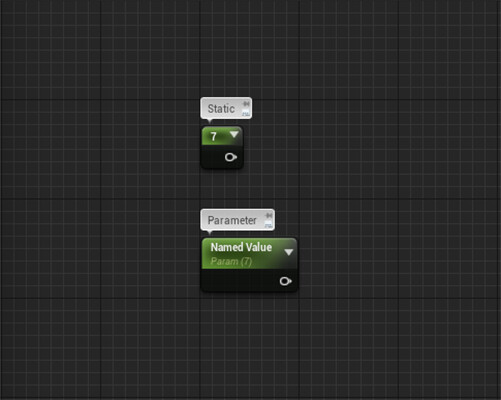 Static values are, well, static. They can only changed inside the Material Editor. Parameters on the other hand can be changed inside Material Instances. Allowing to create multiple varieties and thus different looking materials.
1.1 Material Instances
In simple terms a Material Instance is a much more user friendly child of the Master Mat it is instanced from. It inherits all the properties of the parent material and presents them in an easier to use form.
In a nutshell:
Material Instances do not need to be recompiled when updating a value or texture sample, the change is instant, in real time.
2. But why do we use Master Materials?
The main function of a Master Material is to provide other artists with easy to use Instances that still allow for maximum amount of flexibility and creative control. This can mean many different things depending on the artistic aims of the project. So your first job as the gal who's building the Master Material is to figure out what its requirements are. Can't build a house if you don't know how many rooms and floors it needs.
Master Materials serve as a SPOT (Single Point of Truth) from which all child Instances inherit all their properties. This is especially useful when updating or debuging your Material Graph. The disadvantage here is the time it can take to then recompile all the Instances too, it can take anything from less than a minute to over an hour depending on the size and complexity of your project.
3. Hello World - My first Master Material
For my first Master Material I want the following features:
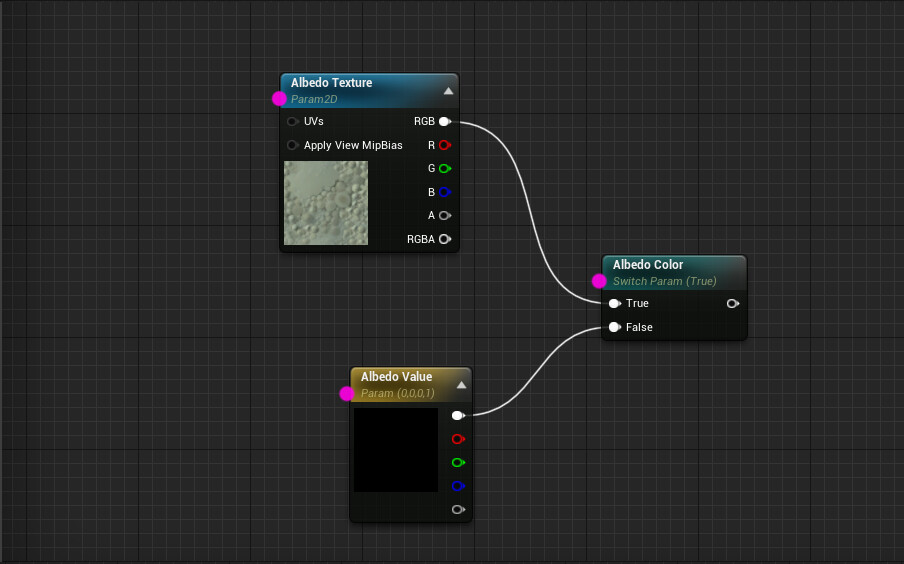
- Use textures or flat value for Albedo
Note that every node here is a parameter. Albedo Texture is a Param2D, Albedo Value is a Vecto4 Param[0,0,0,1] and so is the Static Switch Param (Boolean: True or False). Each one of those is editable in a Material Instance derived from this Master Material.
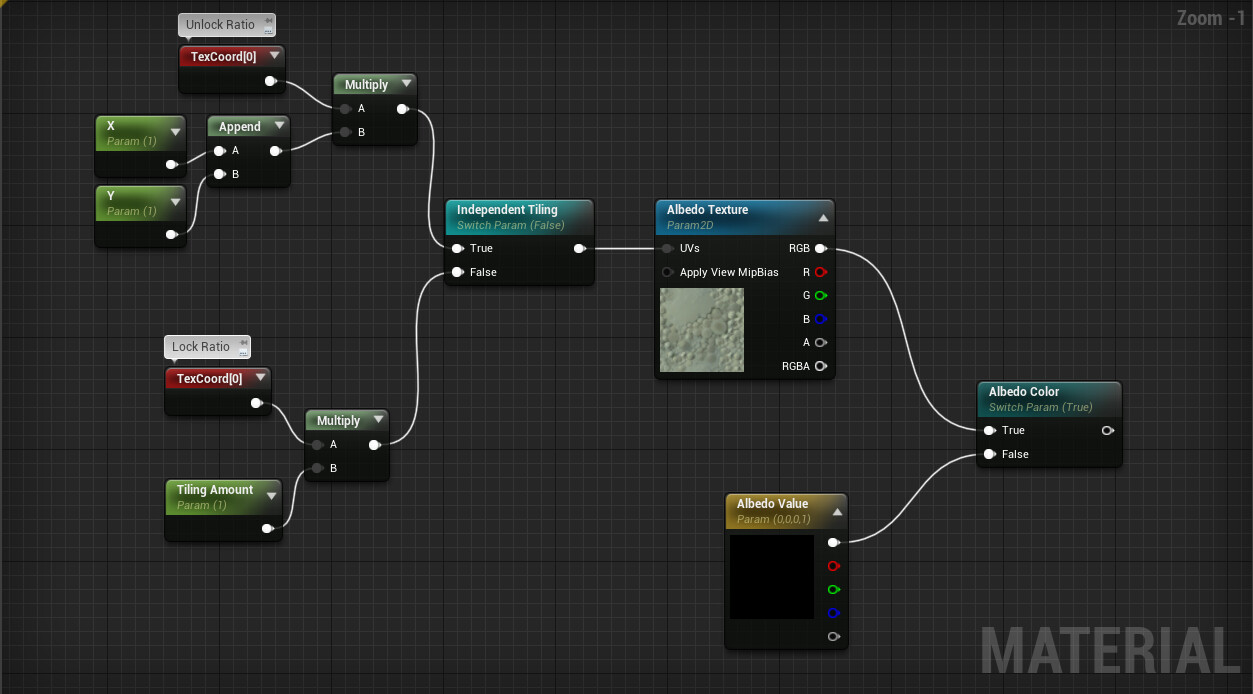
- Be able to tile my material, both with ratio or independantly in X and Y coordinates.
Some nodes cannot be turned into parameters. Neither TexCoord nor Multiply nor Append can be parametrised. But that isn't a problem. For locked ratio tiling I multiply my TexCoord by the Tiling Amount Parameter. For independent tiling I do the same thing but Append the X and Y values together first (Append works like this; 1 appended to 1 gives us [1,1], a Vector2). If this is confusing, remember that Texture Coordinates are represented by U and V values (Vector2). UV Unwrapping anyone?
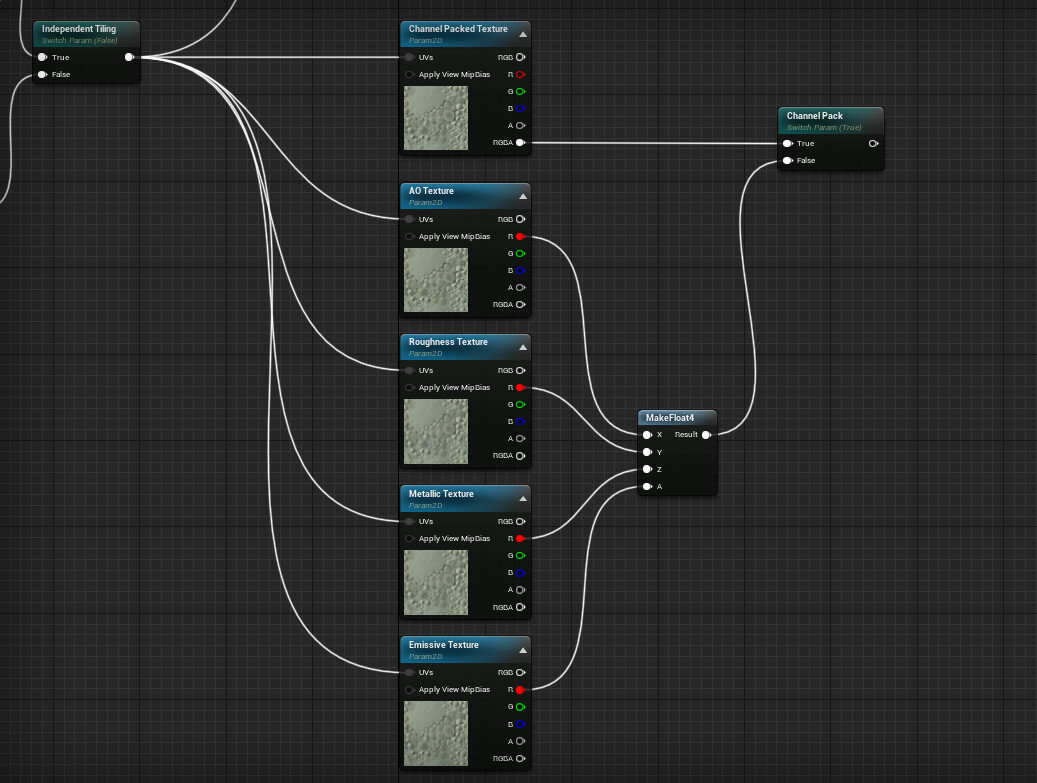
- Be able to use either Channel Packed Texture or independent grayscale ones.
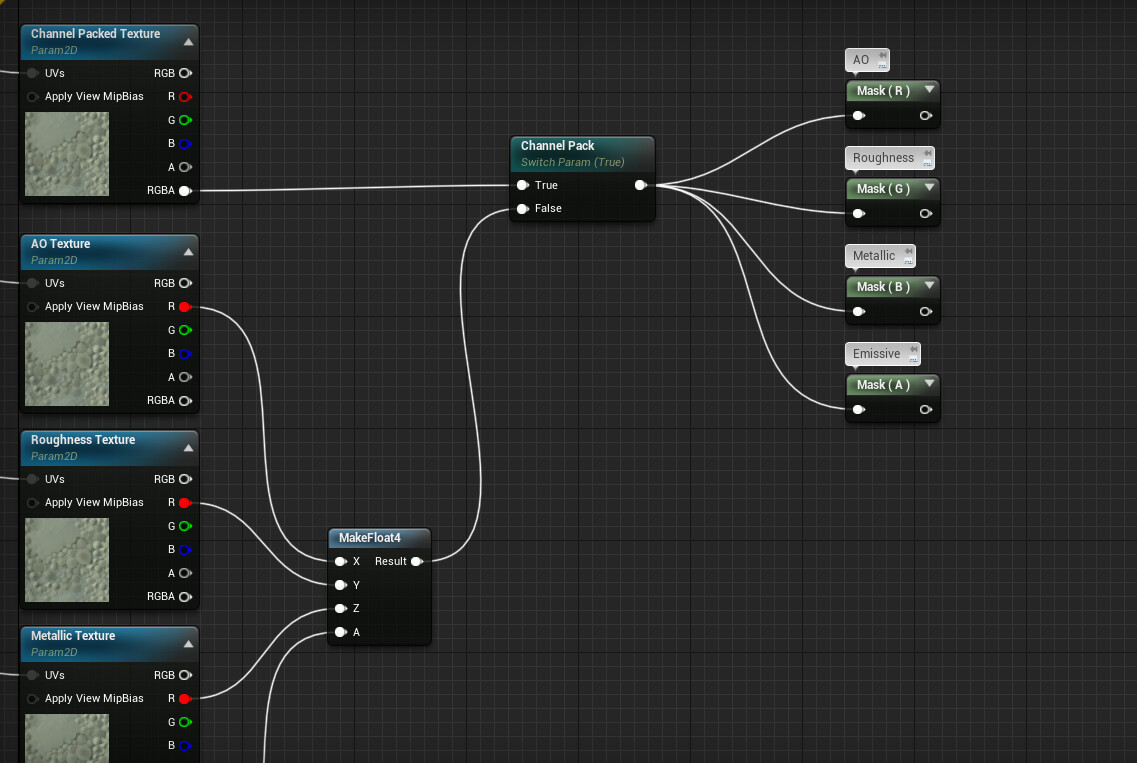
Alongside a Channel Packed Texture I use 4 Texture Param2D nodes here, one for each type of map. I put them together into a Float4 [X,Y,Z,A] using the MakeFloat4 (X,Y,Z,A here can correspond to R,G,B,A) node which I feed into the Channel Pack StaticSwitch Param. If set to False it'll hide the Channel Packed Texture Param2D and use the grayscale ones instead.
Very useful piece of information about black and white images, every channel contains exactly the same value. Why is it useful? Because the MakeFloat4 node only takes single values, if I tried to plug RGB (Float3) or RGBA (Float4) outputs from the Texture Param2D it would not compile. So I'm using the Red channel instead but any other will do (excluding Alpha which is commonly blank unless otherwise authored).
- Be able to split the Vector4 from the previous operation back into individual channels which I can then plug into texture inputs.
One way or another I ended up with a Channel Packed texture of sorts, which I now need to split back into individual channels as the StaticSwitch doesn't do it natively. I use 4 ComponentMask nodes, which allows me to choose which colour channel (or channels) it outputs.
! INTERMISSION !
Like with most things for Game Artists, there are multiple different ways to solve a problem. This is the perfect opportunity to illustrate that. Because there's another way implement the last two steps in our Master Material creation.
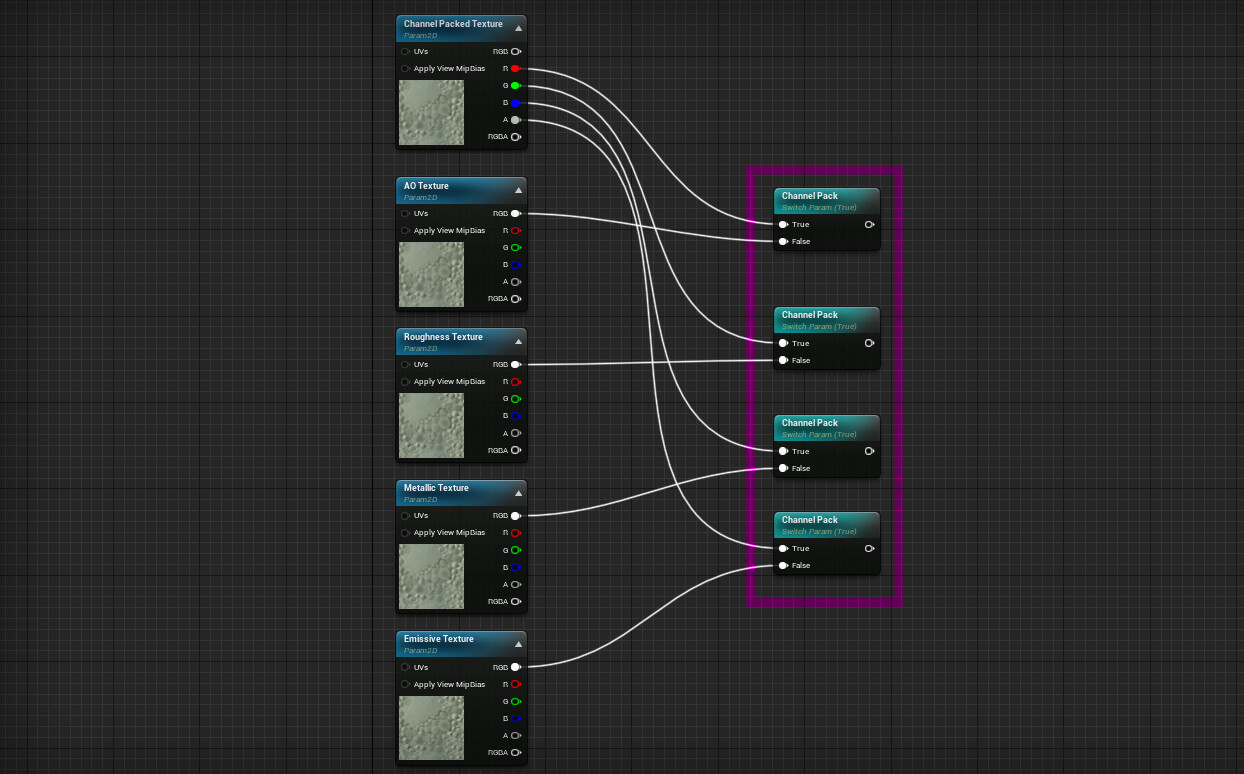
You see Parameters with the same name and type are counted as one and the same. This is represented visually by the nodes changing colour ever so slightly. Above I take advantage of that by using the Channel Pack parameter 4 times. One for each texture channel. I plug individual channels from my Channel Packed Texture into the True value of each Static Switch Param and individual maps into False (Optimally I always want to use one channel for grayscale maps, above setup will cause an ignorable warning in Material Instances but will still compile and work fine).
This results in a cleaner implementation of the same requirement while using fewer shader functions to achieve it.
! END INTERMISSION !
- Be able to colour my emissive and adjust its intensity
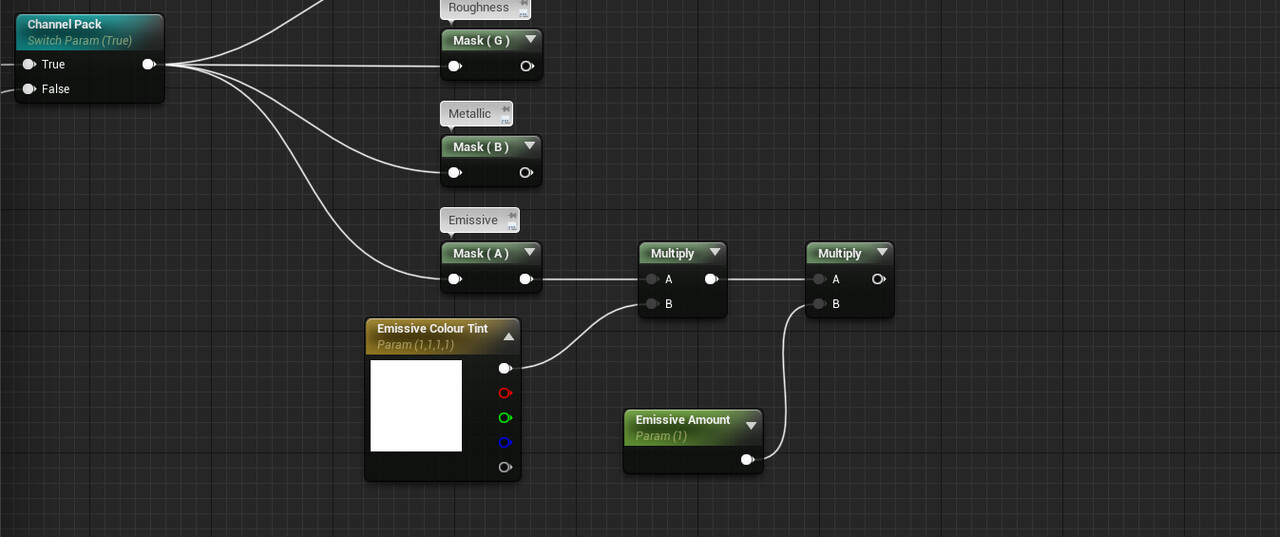
Nothing you haven't seen before, I use the Vector4 to tint my grayscale emissive then I multiply it by the Emissive Amount parameter to adjust intensity. Want to know why Multiply and Divide work differently inside Unreal Material Editor?
I also added a Normal Map Texture Param2D for bump information, it's linked to a StaticSwitch Param that will use a flat normal map if set to False. You can hopefully visualise how that looks now (flat normal in UE can be represented by a Vector3 [0,0,1]).
4. Finishing Touches
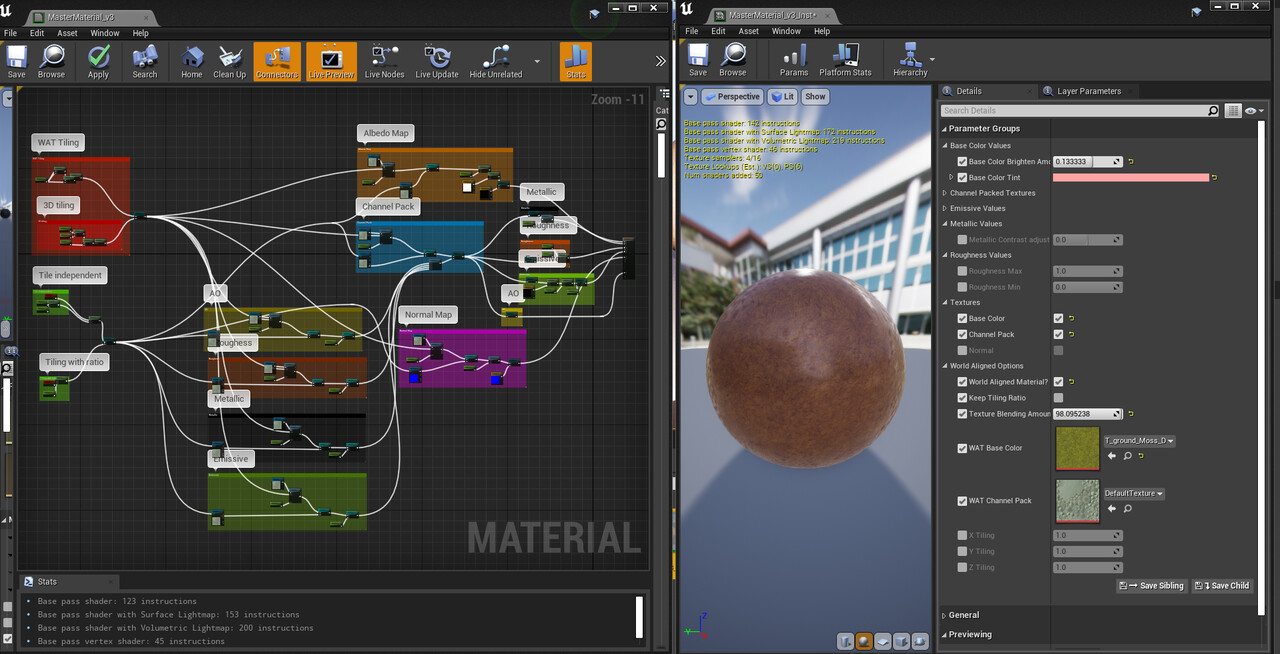
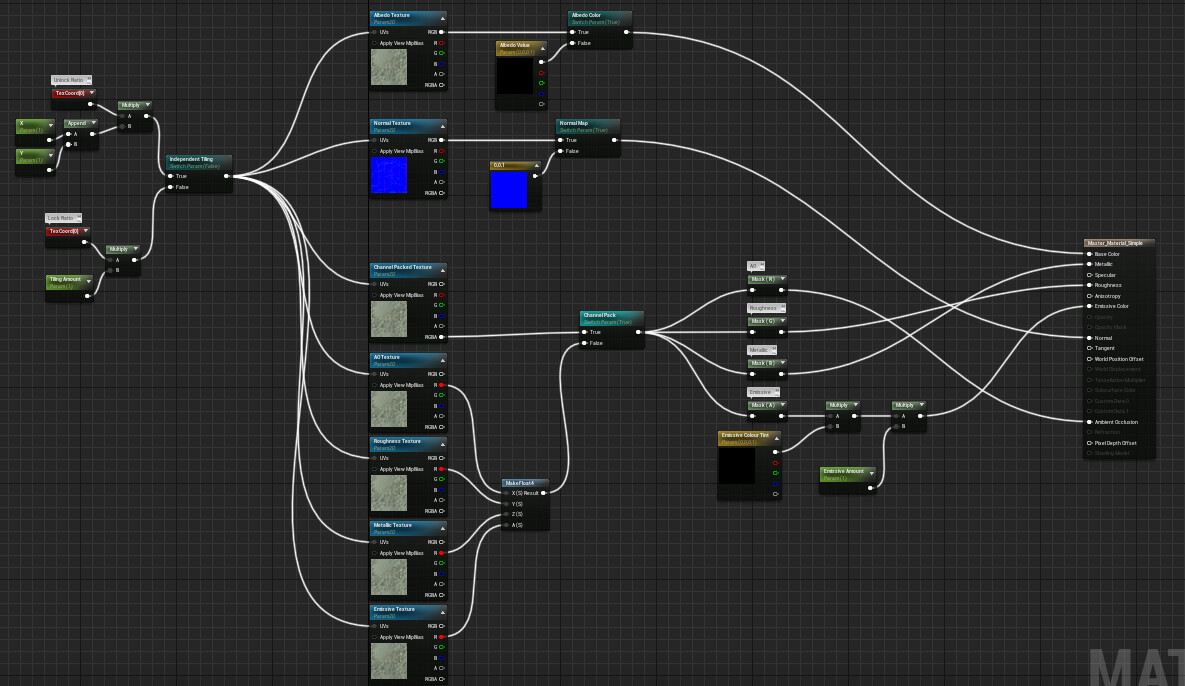
I think that's about it for our first Master Material! Here's how it looks:
It's a bit of a mess and not the most readable. Which is fantastic, because I need to talk about Comments, Reroute Nodes and Parameter Groups. So let's get started.
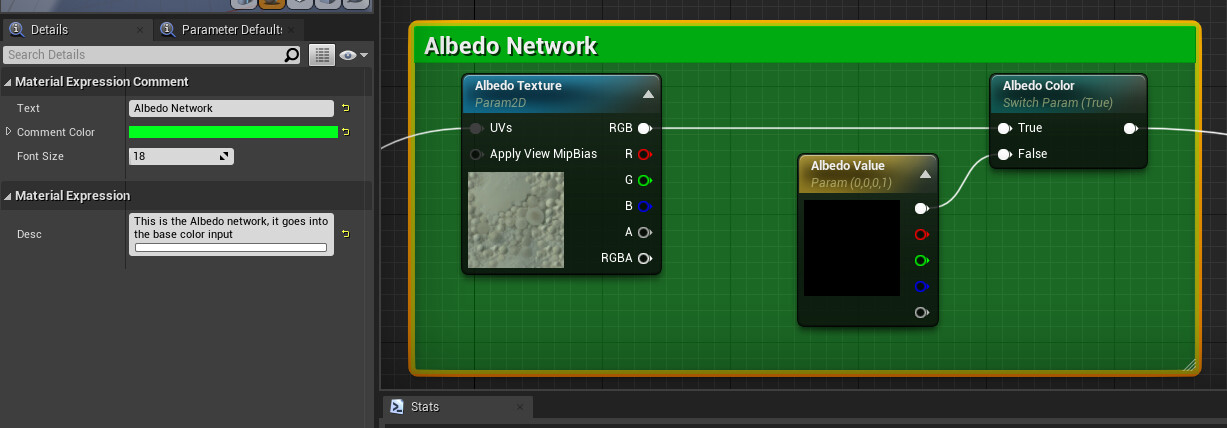
Comments allow us to frame nodes into neat boxes that you can name and change the colour and size of. Simply select the nodes you want to include and press the C key. Encompassed nodes will stay inside even when the comment is moved.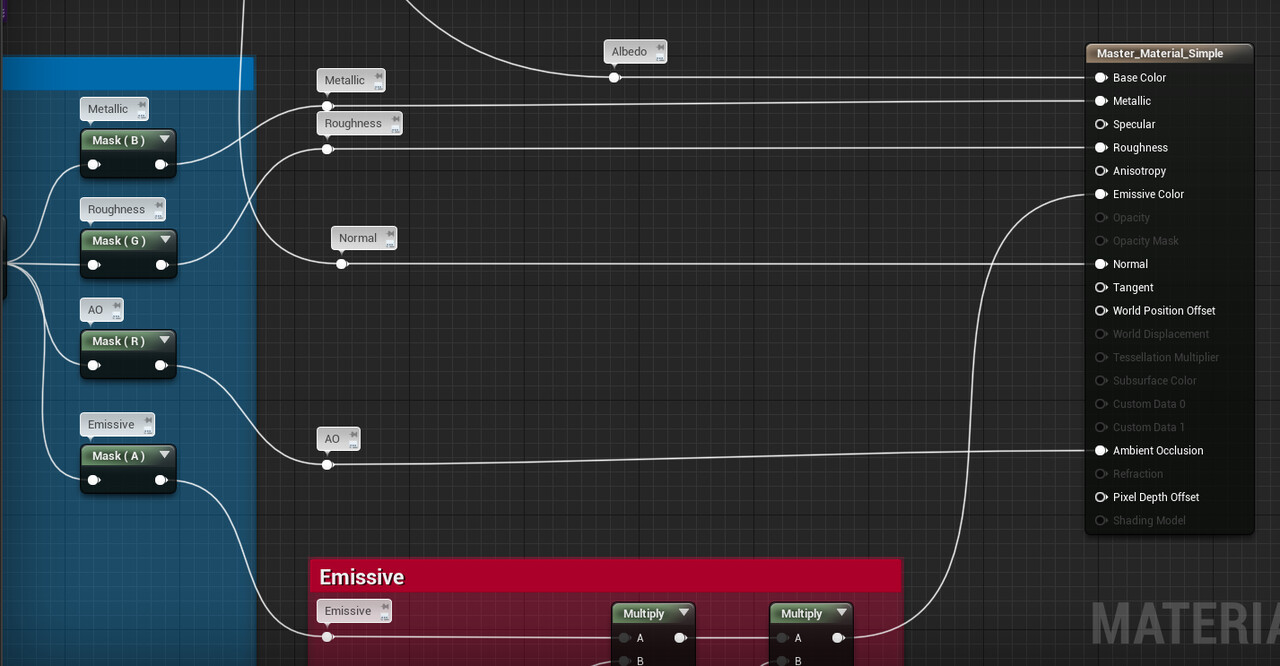
Reroute Nodes are great for organising our spaghetti into more structured noodles. Simply double click at any point on your line and a dot Reroute Node will appear, it can be given a description. It also functions like any other output and can be connected to multiple inputs.
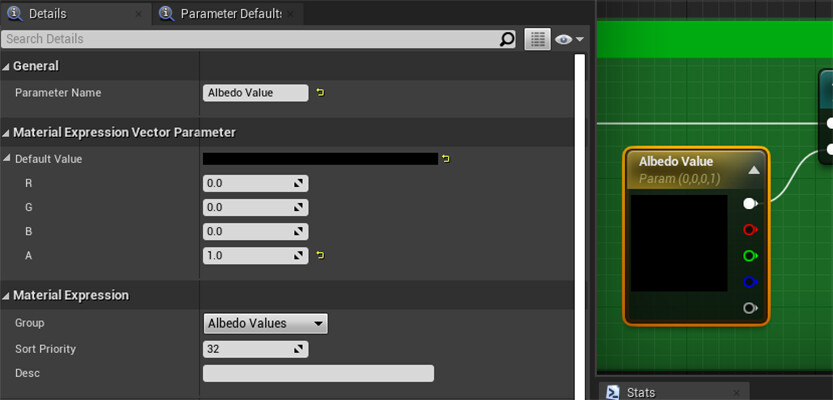
You already know parameters can and should be named (something descriptive!), they can also be grouped together and ordered. The Group dropdown allows you to select group under which your parameter will appear (you can also just type in a new group name here). Sort Priority lets you order your parameters, lower values will appear higher on the list in a Material Instance.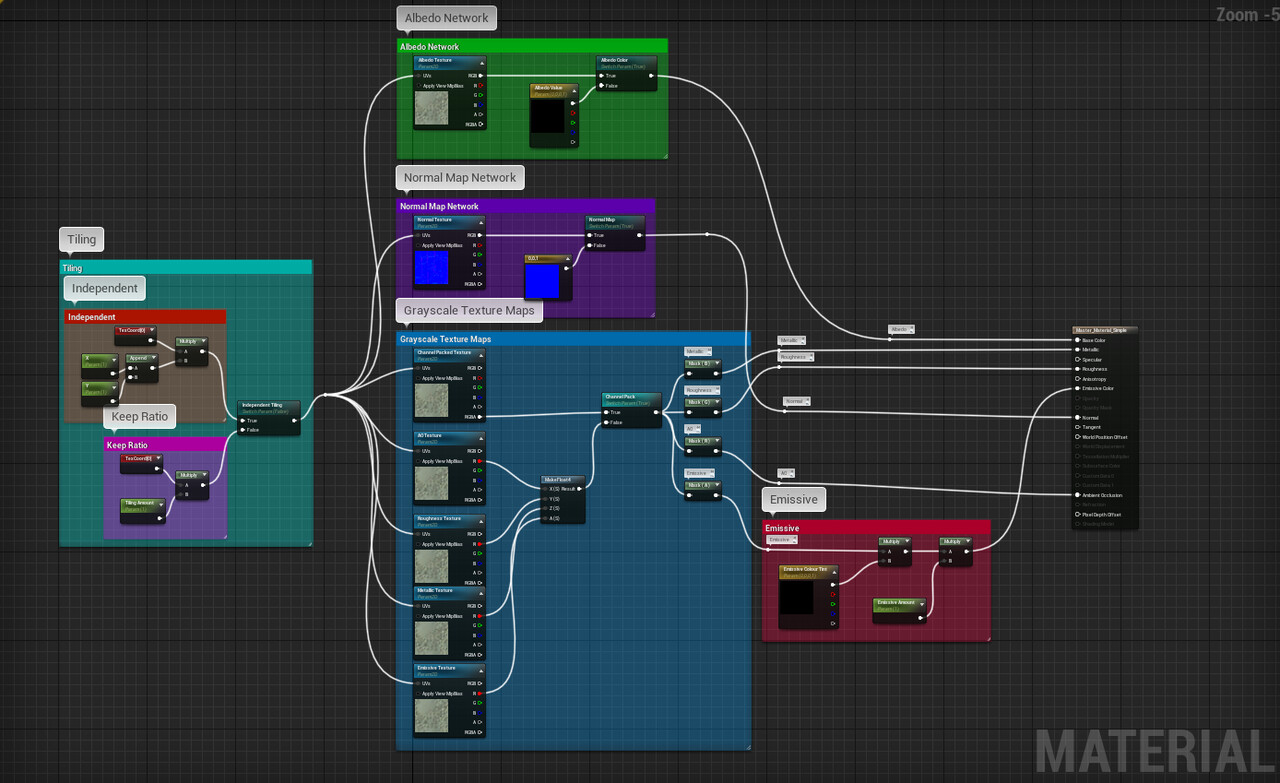
Taking my own advice makes things look much more readable.
Now lets have a look at a Material Instance made from our new Master Material. To create one simply right click on your Master Material and select Create Material Instance. Remember to follow good naming conventions (MI_Name)!
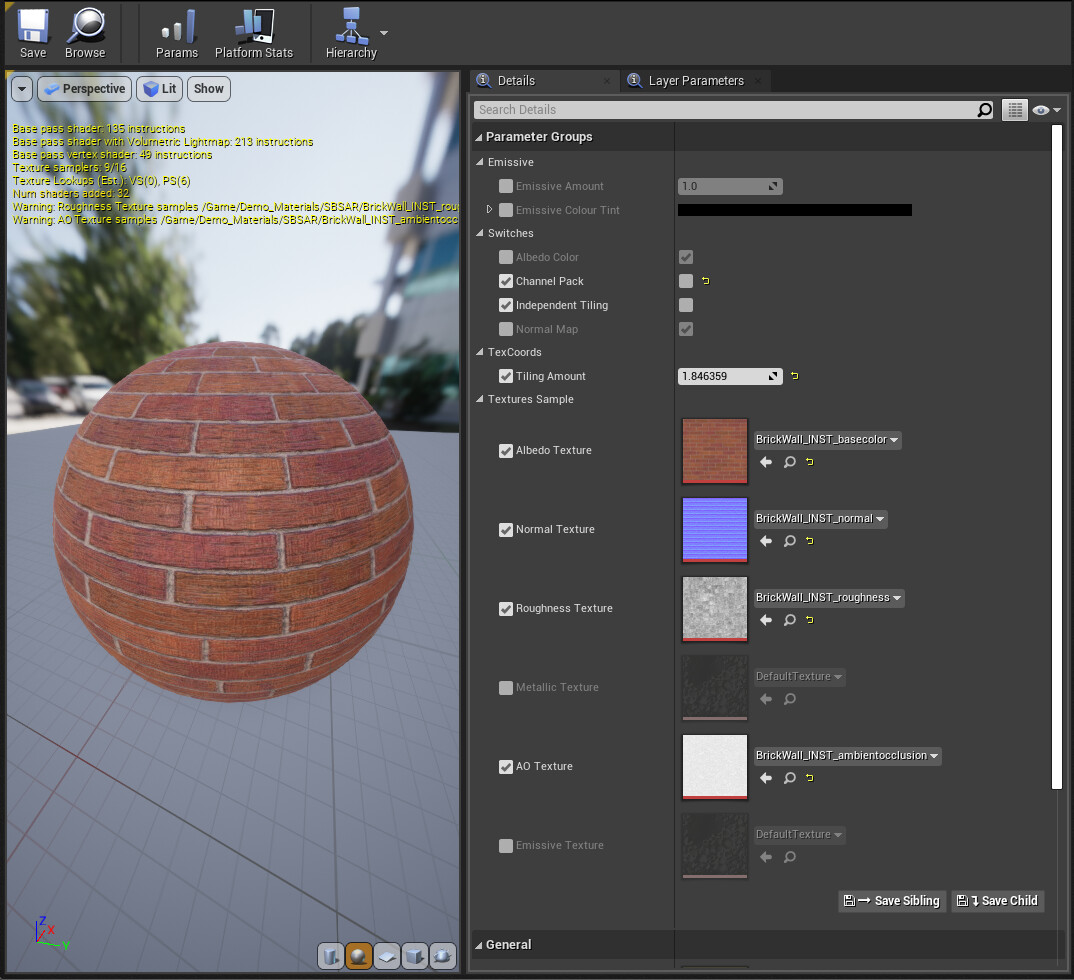
Nice, simple and readable.
And that is all for Master Materials 101. As said, this is a basic overview to get you started.
Creating and Using Material Instances
UE4 - Creating Master Materials
Addendum: High-Level Shader Language
HLSL was developed by Microsoft for Direct3D 9's API sometime around 2002 (GLSL is its analogue for OpenGL). If you're one of my current students, your parents were very excited to welcome you to the world around that time.You don't need to know anything about HLSL other than maybe being aware that ALL shaders, material nodes and whole materials (including every possible permutation) are writen entirely in HLSL in Unreal Engine. The Material Editor is just a convenient GUI we use.
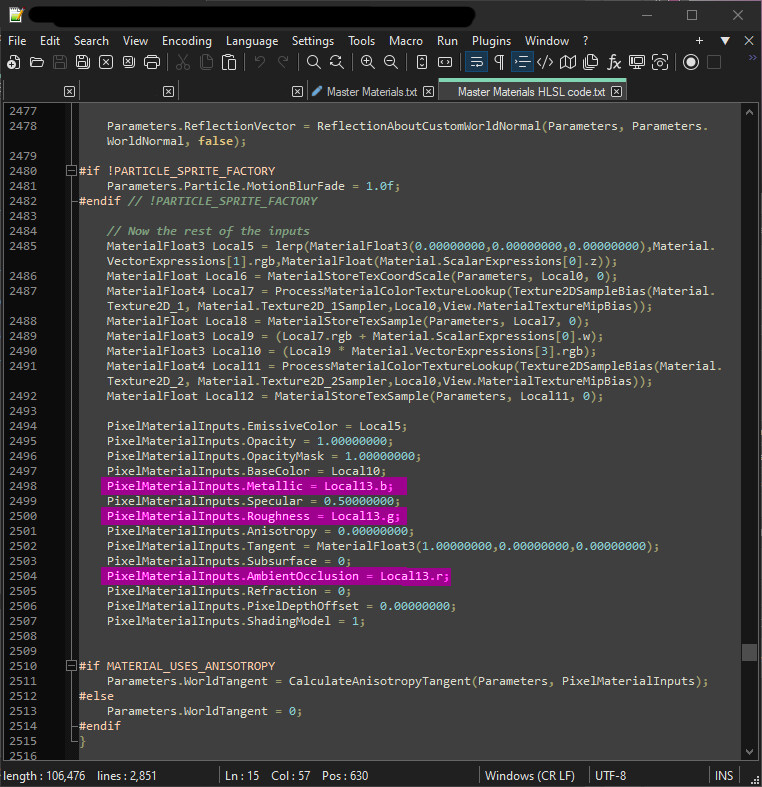
Here's a sample of HLSL from one of my Master Materials. Highlighted in pink are three lines of code responsible from taking a texture sample channel outputs and connecting them to appropriate inputs of the Pixel Shader. In this case Blue to Metallic, Green to Roughness and Red to Ambient Occlusion.
HLSL is based on C programming language, which is why you'll sometimes see HLSL refered to as Cg (C for Graphics).
